| If you are a site administrator you can create entry harvesters that will
scan either the server file system or will fetch web-based resources and
automatically ingest them into the repository.
|
The File Harvester facility allows scans the local file system on the server
and add entries into the database for those files.
For example, say you have a large directory of data (and/or other) files (e.g.,
/project/data)
that you want RAMADDA to provide access to.
The File Harvester can walk the directory tree and add entries into the repository for the files it finds.
The first thing you need to do is to specify in the
Site Administration area
that it is OK to serve up files from that directory tree. Go to the page in RAMADDA
and enter the directory path, e.g.,
/project/data:
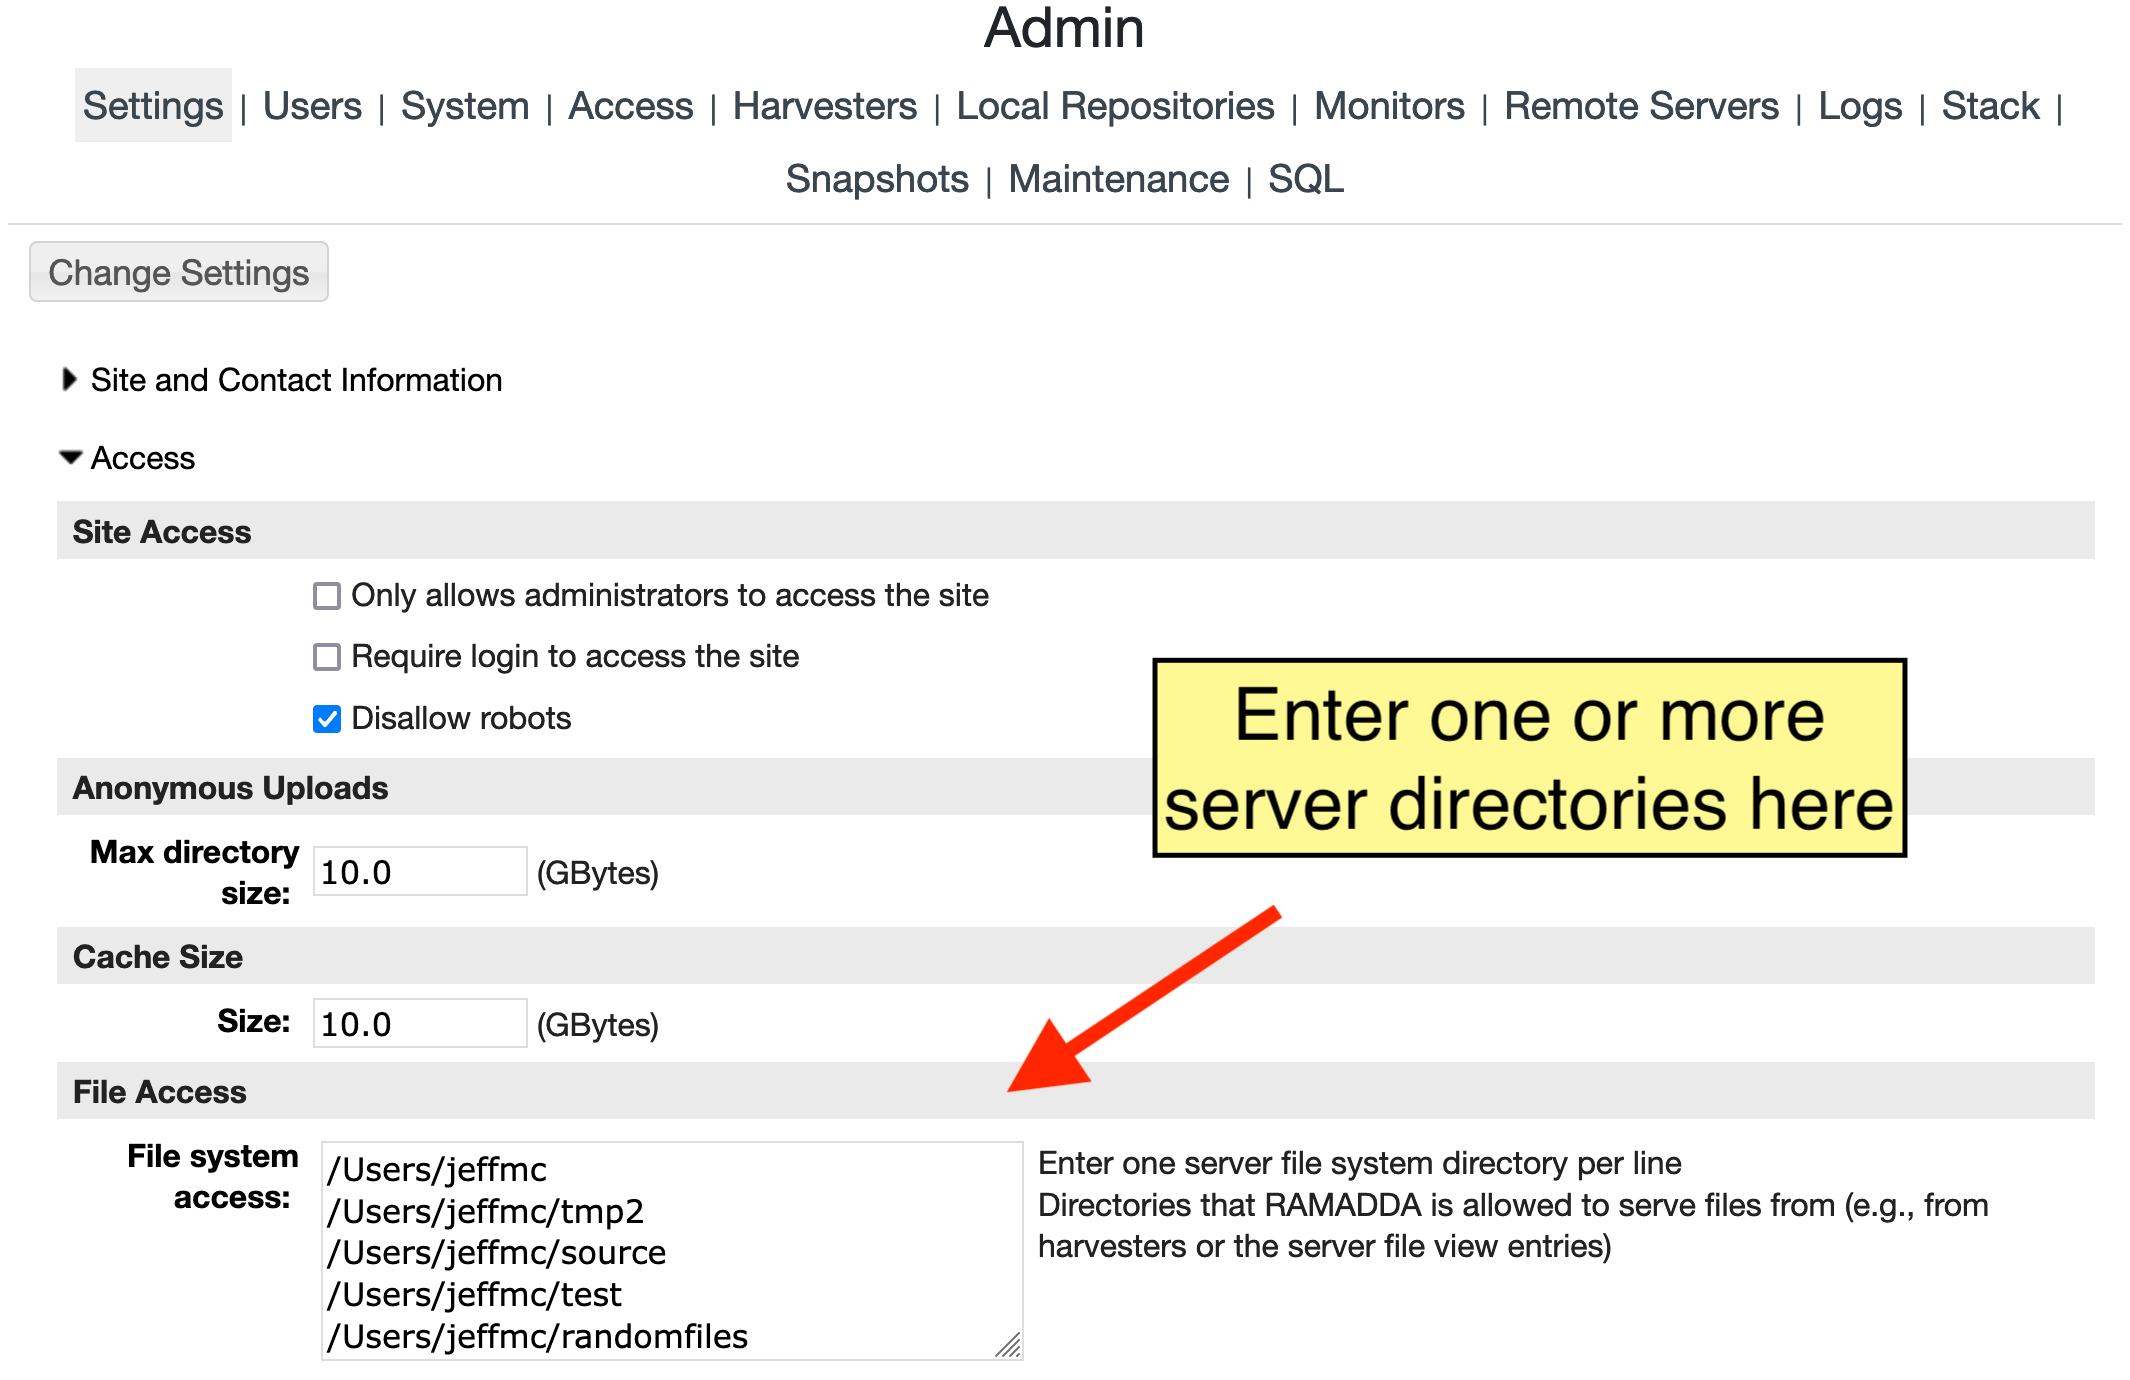 Image 1: File System Access
Next, create a File Harvester by going to the Harvesters tab of the Admin pages and press the "New Harvester" button.
Specify a name (e.g., "Test"), leave the type as Local Files and hit create:
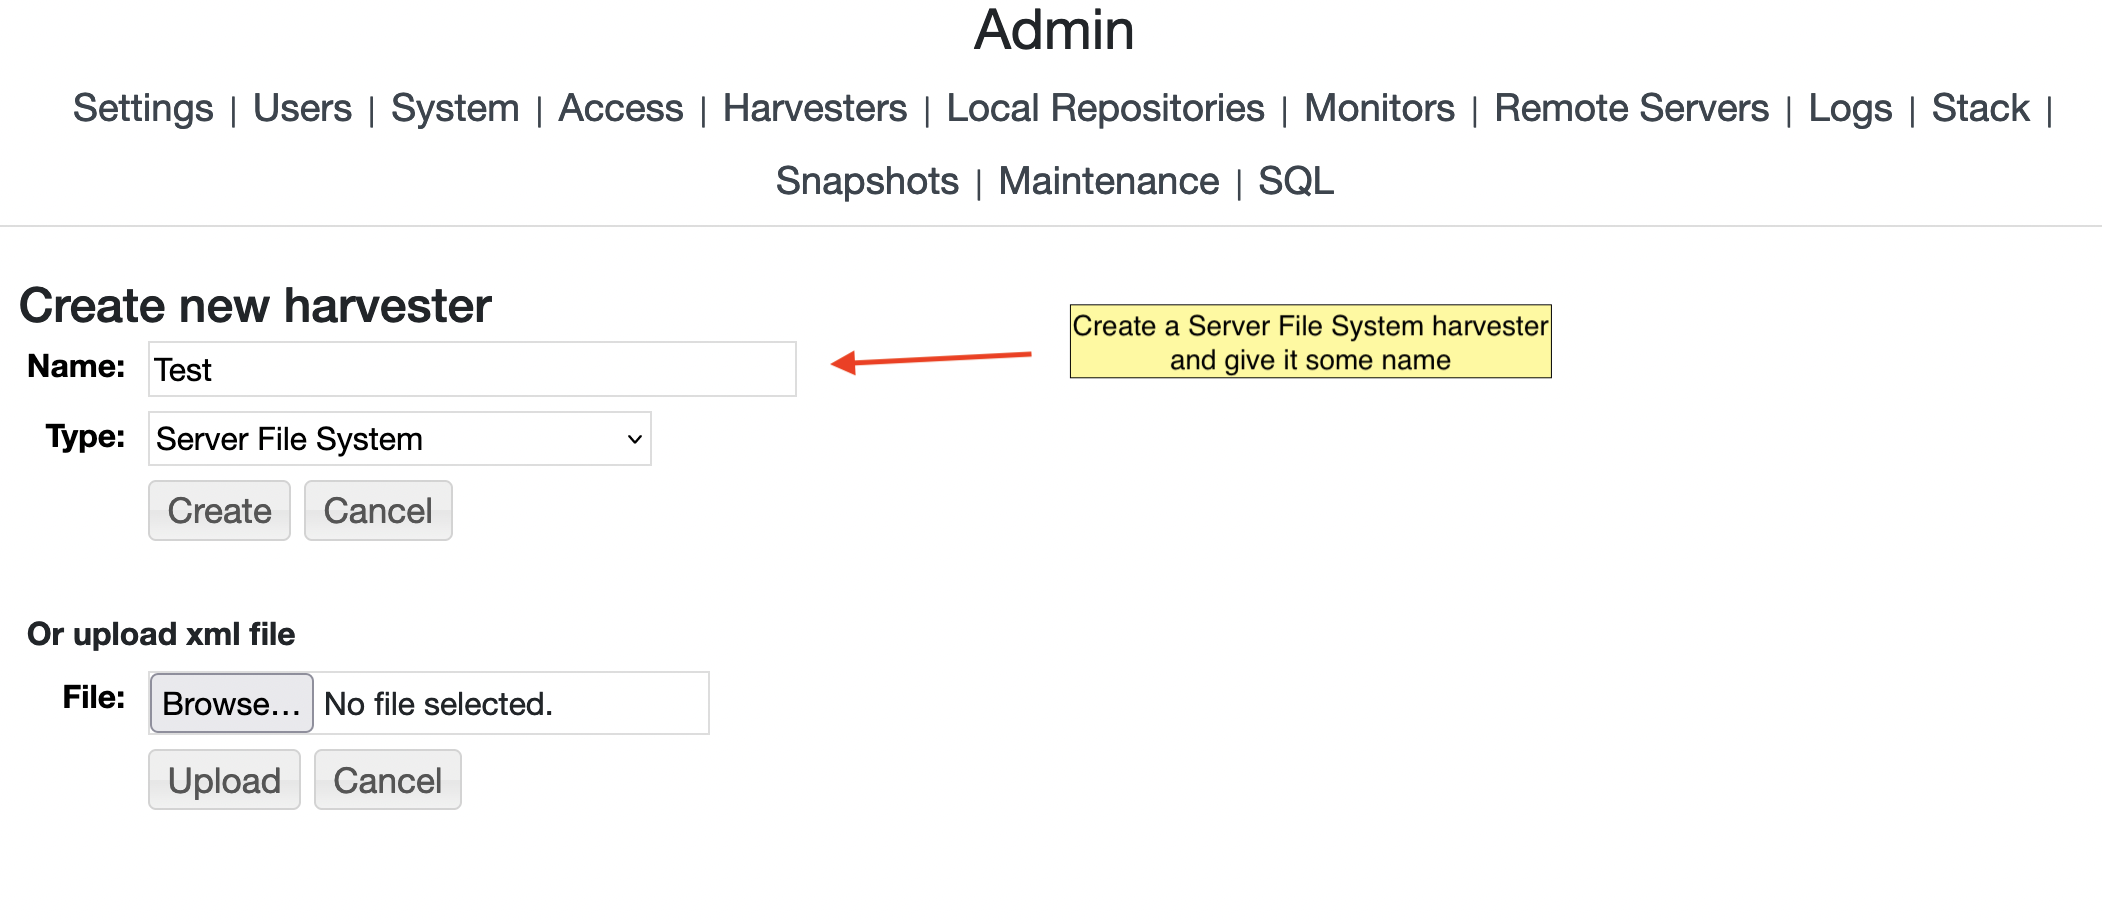 Image 2: Create a new File Harvester
This will take you to the Harvester Edit form. The minimal configuration you need to do here is to enter the file
system directory to scan and the RAMADDA folder to add the harvested entries to. In this example
we are harvesting the directory tree
/project/data and we are adding the entries into
the RAMADDA folder
RAMADDA/Case Studies/Test:
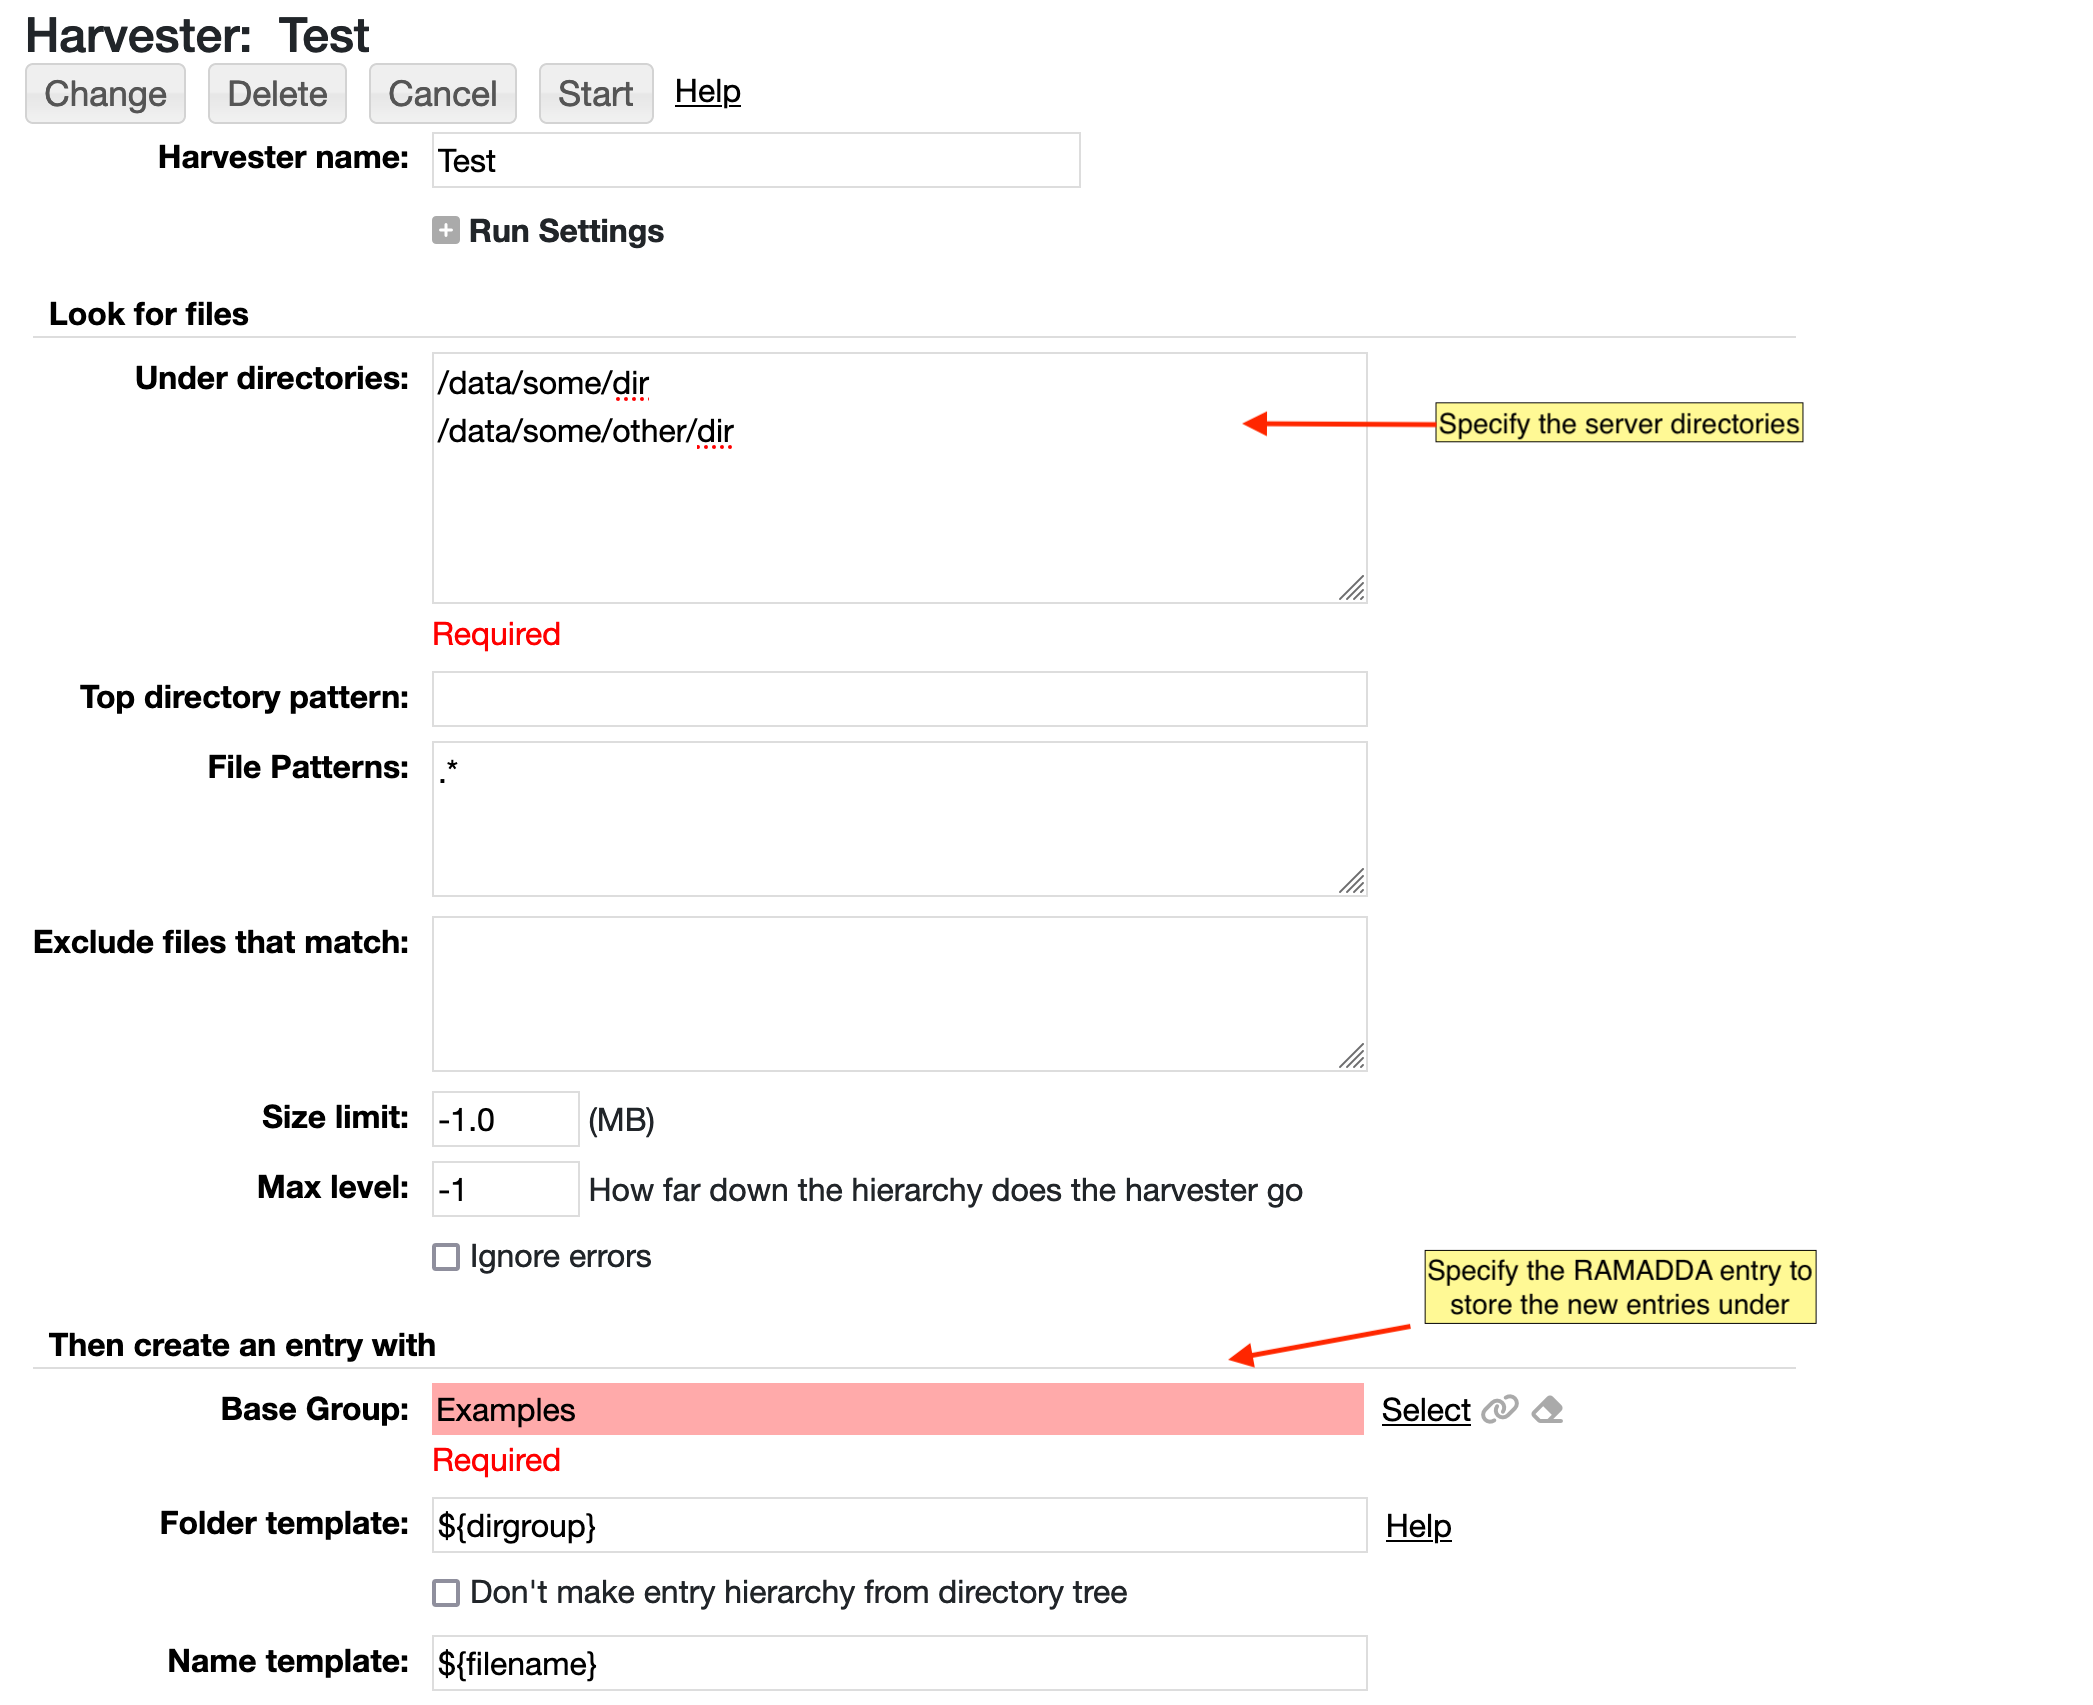 Image 3: Harvester Edit Form
When you have entered this information press "Change" which will apply the changes and then take you back
to the Harvester Edit Form. You can start this Harvester with the "Start" link in the upper right. Or you can
go to the main Harvesters page (the top Harvesters tab) and this will list your Harvester. From there you can start the
Harvester and monitor and/or stop its progress. When it is finished the Stop link will change to Start.
With the above settings the directory tree of your file system will be used to create the
folder hierarchy in RAMADDA. Every file the Harvester finds will result in a file entry. You can run
a Harvester any number of times and it will only add the new files that it has not seen before.
The form has settings for running the harvester. When you are first creating a harvester sometimes it
may takes some time to figure out just what you are harvesting and the name and folder settings for the repository
entry. So, its good to turn on test mode. This will result in entries not being added to the repository when you run
the harvester. Rather, when in test mode, up to "Count" number of files will be found and the results will be
listed in the "Information" section of the harvester page.
The "Active on startup" flag, when set, results in the harvester being started when the repository
starts up. The "Run continually" flag has the harvester continually run. It uses the "Every" setting
to determine the pauses between runs. You can choose Absolute time to pause every N minutes. Or, you can choose
"Minutes" or "Hourly" to have it run relative to the hour or the day, e.g. "3 hourly"
will run at 0Z, 3Z, 6Z, 9Z, etc.
For example, if you know you are getting data files in real-time that are coming in every 30 minutes you could set your harvester
to run in "Absolute" mode every 15 minutes. If you had a Web harvester that is fetching images
you might want to use an "Hourly" setting to get the image at some fixed interval (e.g., 0Z, 6Z, 12Z, 18Z, etc).
Under "Look for files" you specify one or more directories on the server file system to scan.
These directories must be in the list of accessible directories in the
Admin settings.
The harvester will recursively scan the directory tree and any files that meet the following criteria
will be added as entries to the repository.
Top directory pattern
You can specify a top-level directory name to limit the harvest to with this field.
Note: This field is used to create the relative file name used in the File Patterns check. So, it needs to be just
the name of a directory or, if you want to harvester multiple top-level directories it needs to be a pattern of the form:
(name1|name2|name3|...)
File Patterns
You can specify one or more
regular expression patterns
that are used to match on the descendent files.
There following macros are available:
| Macro | Regexp | |
| <NOCASE> | (?i) | No case |
| <ROOT> | ^.' | Root dir |
| <ALL> | .* | Match all |
| <FILES> | [^/]+$ | Match on any file |
| <DIRS> | (?:[^/]+/)* | Match any number of directories |
| prefix:<some prefix> | | Prepend to all patterns |
| # comment | | comment line |
e.g.:
#prepend no case and the file root
prefix:<NOCASE><ROOT>
#Data: Corelyzer subdirectory: include all files and subdirectories
/Data/Corelyzer/<ALL>
#Sampling subdir: include Excel files only
/Data/Sampling/.*.xlsx?$
#XRF: include all top-level files, ignore subdirectories
1/Data/XRF/<FILES>
#ICD: Include all top-level files
/ICD/<FILES>
The regular expressions used are extended in that you can specify subsets of the regular expression
and use the result text for metadata and other information when creating the entry in the repository.
For example, a very common case is to have a date/time embedded in the filename. So, you could have in your regular
expression something of the form:
.*data(fromdate:\d\d\d\d\d\d\d\d_\d\d\d\d)\.nc
This would match any files of the form:
data_yyyymmdd_hhmm.nc
The "(" and ")" define the sub-expression (just like normal regular expression). But the
"fromdate:" is the special extension that tells the harvester that that sub-expression
is used to create the repository entry fromdate field.
The date format that is used is defined in the Date Format field and follows the
Java date format conventions.
If you are creating entries of a certain type that has a number of attributes you can extract the attribute values
using this extended regular expression technique. For example, if you had an entry with two attributes attr1 and attr2
and your files were of the format:
<attr1>_<attr2>.csv
Your regular expression would be:
(attr1:[^/]+.)_(attr2:[^/]*).csv
This says that attr1 is any number of characters except the slash ("/"). The slash exclusion is
used to exclude the file path as the full file path is used when matching patterns.
The value for attr2 follows the "_" and is any number of characters except a slash.
Other fields that can be specified include "todate:"e and any of the columns of the
target entry type.
Exclude files that match
This is one or more
regular expression
that, if matched, exclude the file from the harvest.
Skip file time check
Normally, the harvester won't harvest a file that has been changed within the last 30 seconds.
This is done to handle data files that are being streamed in in real-time.
Set this to true to not check the file time.
Size limit
Set this to exclude files over a certain size (MB)
Max level
Set this to 0 if you just want to harvest the files directly under the directory being scanned.
Set this to some other value to limit the depth of the scan
Uniqueness
When running the harvester multiple times the existing entries are checked for uniqueness.
- By entry name - is there an entry under the parent entry with the same name
- By entry name - is there an entry under the parent entry with the same name
- Global - if checked then the entires repository is checked, not just the parent entry
Ignore errors
Should the harvest continue if there is an error harvesting a particular file
Base Group
This is the destination entry where the harvested entries are added to
Folder template
As the file system directories are recursed a folder entry is created for each file system directory.
The folder entry is created through the use of the Folder template which can contain a set of macros (see below).
To define the folder you need to select an existing base folder and then optionally specify
a folder template. The folder template is used to automatically create a new folder if needed.
So for example, if your base folder was:
Top/Data and your Folder Template was:
Ingested/Satellite
then the result folder would be:
Top/Data/Ingested/Satellite
The Harvester would create the
Ingested and the
Satellite folders as needed.
The name, description and folder templates all can contain the following macros.
Note: The different date fields (e.g., create_, from_ and to) refer to
the create date/time, the from data time (which defaults to the create date
unless specified in the pattern) and the to data time.
| ${filename} | The file name (not the full path) |
| ${fileextension} | The file extension |
| ${dirgroup} | See below |
| ${create_date},${from_date}, ${to_date} | The full formatted date string |
| ${create_day}, ${from_day}, ${to_day} | The numeric day of the month |
| ${create_week}, ${from_week}, ${to_week} | The numeric week of the month |
| ${create_weekofyear}, ${from_weekofyear}, ${to_weekofyear} | The numeric week of the year |
| ${create_month},${from_month}, ${to_month} | Numeric month of the year |
| ${create_monthname},${from_monthname}, ${to_monthname} | Month name |
| ${create_year}, ${from_year}, ${to_year} | Numeric year |
The dirgroup macro is the parent directories of the
data file up to but not including the main directory path we are searching under.
For example, if you are looking under a directory called "/data/idd" and that directory held sub-dirs:
/data/idd/dir1/data1.nc
/data/idd/dir1/dir2/data2.nc
Then when ingesting the data1.nc file its dirgroup value would be:
dir1
When ingesting the data2.nc file its dirgroup value would be:
dir1/dir2
Another common way of defining the folder is to use the date macros. For example a folder template of the form:
${from_year}/${from_monthname}/Week ${from_week}
Would result in folders like:
2009/January/Week 1
2009/January/Week 2
...
2009/March/Week 1
2009/March/Week 2
Last Folder Type
This is the entry type of the folder entry that contains any file entries.
For example, you may have a directory structure like:
top directory
    sub directory
       images
         image1.jpg
         image2.jpg
         ...
In this case the a normal folder entry is created to the "sub directory".
However, the for the "images" directory we would want to specify a "Photo Album" entry type
as the last folder type.
Name template
You can also name the entries using the macros.
So, using the above date based folder template you could then have a Name template that incorporates the formatted date:
Gridded data - ${from_date}
Description template
This is the entry description to use
Default entry type
RAMADDA tries to determine the entry type to create for a file based on the file name.
For example, when RAMADDA sees a file with the suffix ".geojson" it creates a GeoJSON map entry type
base on a pattern that matches on ".geojson".
However, not all entry types have patterns to match files on. The Default entry type
allows you to specify what type of entry to create for all of the harvested files.
Type Patterns
For the case where there are multiple file types that are being harvested the Type Patterns
field allows you to specify one or more mappings (one per line) of the entry type to a
regular expression
that matches on the file name.
This would be of the form:
some_entry_type: some pattern
some_other_entry_type: some other pattern
For example, if you are harvesting a set of images and you want to use the "Borehole Core Image" entry type
for any images with the name "measurement.jpg" you would specify:
type_borehole_coreimage:measurement.jpg
This is a pattern that can be used on the file name that, if matched, corresponds to a date/time that is used for the entry
Move file to storage
This allows you to determine whether the file is to be moved from its initial location
to the RAMADDA storage area. Normally, when harvesting a directory tree the files
are left in place.
Delete matching entry and re-add
If you run the harvester multiple times this flag allows you to delete any existing entry
and reharvest if the file size has changed. This allows for essentially updating the
entry with new metadata, etc.
These flags determine whether metadata should be harvested from the files
Images
These determine whether OCR is run on the images (if OCR is installed on your server).
Clean name
Should the name of the entry be cleaned up based on the file name. e.g., turning:
some_image.jpg
To the entry name:
Some Image
Aliases
When determining the name of the entry this converts file name substrings to longer names, e.g. change
co_some_file.jpg
To the entry name
Colorado Some File
With the alias:
co:Colorado
Owner
Specify the user ID of the owner
The Web Harvesters work the same way as the File Harvesters but they fetch a URL (e.g., an image) every time they
run. You can also define more that one URLS to fetch . The basic Run settings, Folder and entry creation mechanisms
are the same as described above.