You can define access control settings under the "Edit -> Permissions" menu for an entry.
The access control mechanism in RAMADDA is centered around a set of actions that can be
applied to entries -
view, new, edit, etc.
For each action a set of user roles can be specified
that grant or remove permissions to do those actions.
The form is composed of this list of actions and, for each action,
there is a field where you can enter any number of user roles (one per line).
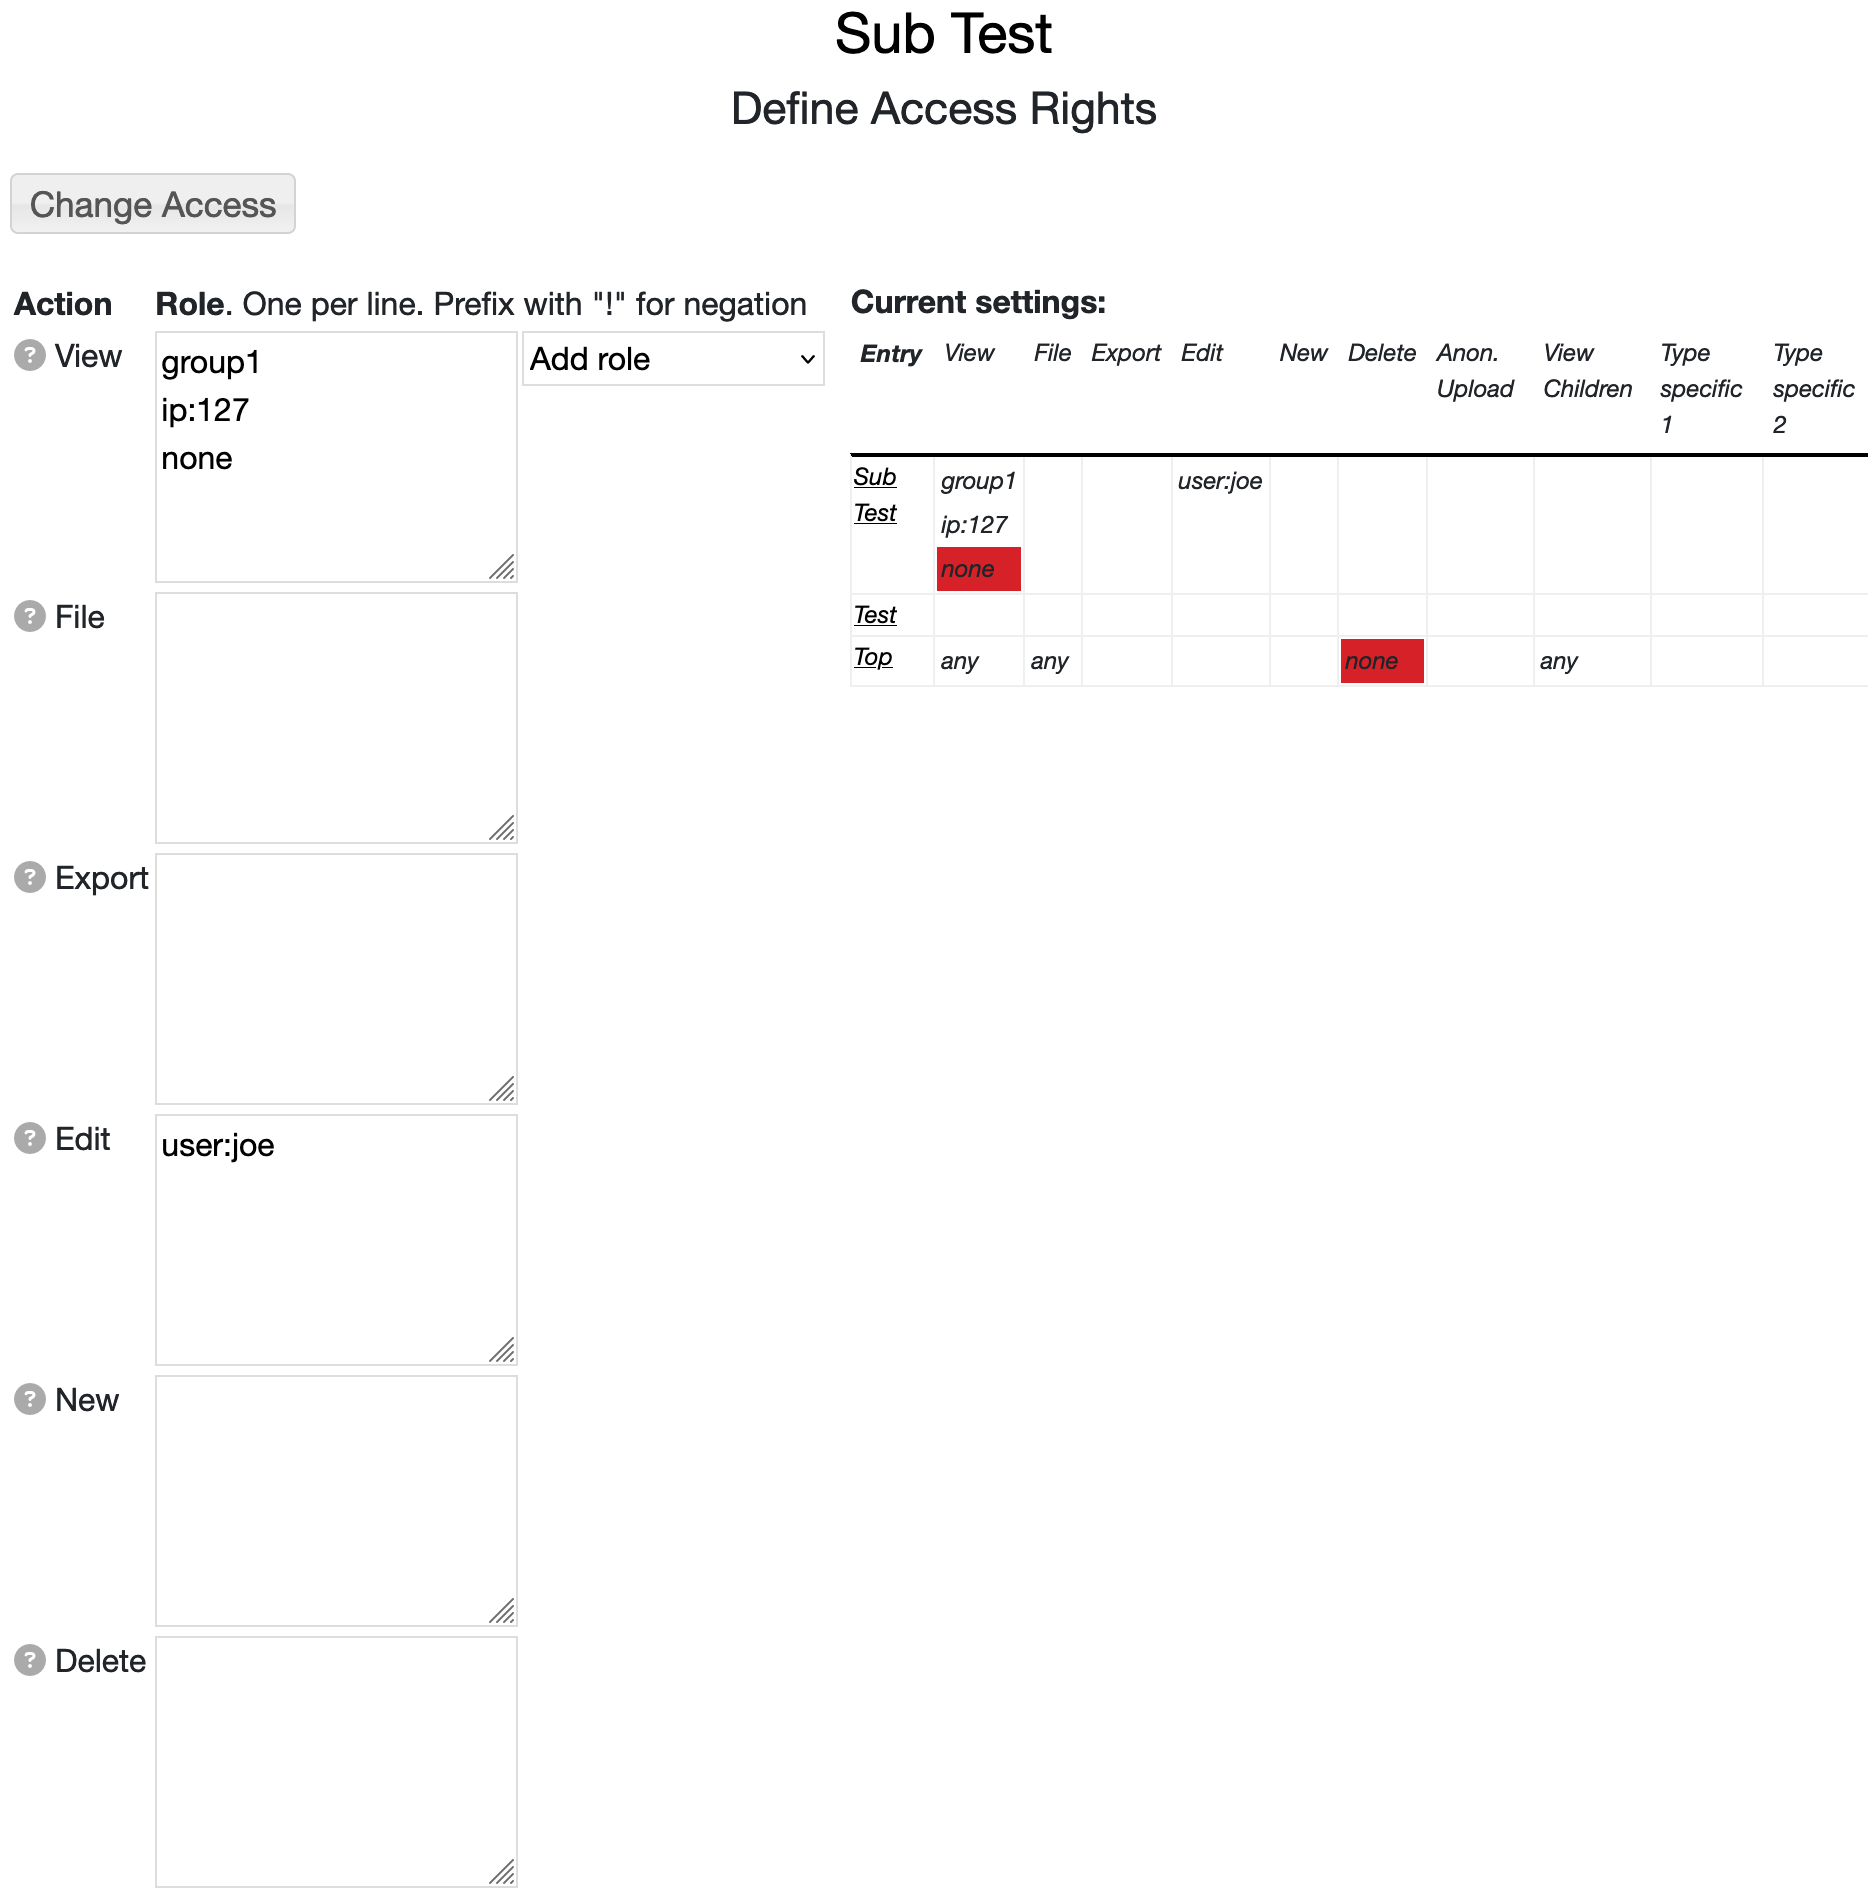 Image 1: Entry Permissions
| Note: Permissions settings have no effect on RAMADDA site administrators. They can do anything.
|
| Note: after setting access (e.g., creating a private space) it is best to log out (or user another browser)
and check if the access is set to what you think it is.
|
The roles for a user are defined by the RAMADDA administrator through the Admin-Users page.
Other "special" roles include:
- "none" - this denies access to any user
- "user" - any logged in user
- "any" - any user, either logged in or anonymous
- "anonymous" - non logged in user
- "ip:prefix" - The user is coming from an IP address that begins with prefix
Furthermore, any role can be negated with "!"
In the example shown above any user in the role "group1" can view anything under the
sub test entry.
No other user can view the "sub test" because of the "none" specified.
Along with the view access, the user "joe" can also edit the entry and any entry under
the entry.
On the right shows a summary table for the particular entry being viewed.
This shows the access control
settings for all of the ancestor entries of the current entry and allows the
user to see just what access settings are applicable to the entry.
| To see if a given user has the ability to do a particular action for a particular entry RAMADDA looks
at the permissions for the entry and its ancestors and either looks for the
first permission grant or the first permission denial.
If nothing matches then permission is not granted.
|
Here are other examples:
- To make a whole tree of entries inaccessable - under the view action enter:
none
This will only allow admins and entry owners to view anything under that tree.
- To make an entry (or tree of entries) inaccessable to non logged in users - under the view action enter:
user
none
- To make an entry (or tree of entries) inaccessable to users outside of an ip address - under the view action enter:
ip:some_ip_prefix
none
- To allow anyone to view the entries in a tree but don't allow anyone to
access the files then under the file action enter:
none
- To allow anyone to view the entries in a tree but only allow file access to
users who are coming from the IP address 123.456 then
under the file action do:
ip:123.456
none
-
It is often the case that researchers are granted an embargo period on any data collected
in a project, i.e., the data can be accessed after a certain date.
This type of permission can be defined with a special "date:" role.
For example, to restrict access until after March 2025 specify:
date:2025-03-01
none
- If you wanted to give a certain user permission (e.g., joe) to view the entry but not allow
any one else to view the entry then enter under the view action:
user:joe
none
RAMADDA would first check if the given user was "joe". If it is "joe" then permission is granted. If
its not "joe" then RAMADDA looks at the next role - "none". This blocks any other access.
- To allow for a group of users in the role "group1" to be able to edit and create new entries under a whole
tree then enter:
group1
for both the edit and the new actions.
- A common case is to allow one role to have new and edit capabilities under a whole tree (like the group1
example above) but to grant new and edit capabilities to some other user to a sub tree. For this you would
grant the access to the parent entry like above, e.g.:
- parent entry - access =
group1
- ...
- descendent entry - access =
otheruser
Each access type can contain any number of roles (one per line).
- Special roles
- any - this is a special role and says that anyone can do the action.
- none - nobody (except admins) can do the action.
- user - any logged in user
- anonymous - the user is not logged in
- guest - the user is a guest user
- Assigned user roles - All users can have one or more roles. This is set by the site administrator
when editing the user. They are just string names. For example, you might have the roles "group1" and
"group2". If you wanted to grant access to "group1" you would just enter:
group1
If you wanted to grant access to users in either group1 or group2 you would enter:
group1
group2
- Self identity role - If you enter a role in the form as user:someuserid this grants
access to that specific user. So, if you wanted to give "joe" access to something enter:
user:joe
- ip:ip address - This format grants access to incoming requests with the given ip address or ip address suffix.
For example, the following would grant access to any request coming from any IP address that starts with 128.117
ip:128.117
- Date access - this role specifies a date. The role is only effective after the specified date, e.g.:
date:yyyy-MM-dd
- !some role - Prefixing a role with "!" is a way to deny specific access to a user, role, or ip address.
For example, the following would deny access to any request coming from any IP address that starts with 128.117:
!ip:128.117
Say you want to grant access to user "joe" but deny access to user "jim". You would do:
user:joe
!user:jim
The different access types are:
RAMADDA has support for a data policy mechanism that allows for
the specification of a data license and access settings in a centralized
location.
This allows for the use of a single data policy across multiple
entries within a single RAMADDA repository as well as sharing data policies
across a group of confederated RAMADDA repositories.
The specification of a Data Policy is done using a special purpose Data Policy
entry. Here is an
example
of such a
Data Policy entry. Only site administrators can create a Data Policy entry. When defining
permissions the set of Data Policy entries will be displayed and can be selected. This
essentially uses the permissions defined by these Data Policies. This can enable
one to, for example, define some permissions for a project (e.g. a date embargo) in on place
then use those permissions across mulitple entries.
For information on using Data Policies across multiple RAMADDA's
see the documentation at
https://ramadda.org/repository/a/datapolicy
for more details.
A RAMADDA repository is configured to read in data policies
from a set of URLs specified in a repository.properties file
in your local RAMADDA home directory.
#Comma separated list of URLS to fetch the data policies from
#Use "this" to refer to the current RAMADDA
ramadda.datapolicy.urls=this,https://ramadda.org/datapolicy/v1/list

#Number of minutes between fetches of data policies from the URLs
ramadda.datapolicy.sleepminutes=30

#Set this property to turn on debugging
ramadda.datapolicy.debug=true
The URLs specified are read at a given frequency (with the property above).
Each URL returns a document that has one or more data policies.
A data policy consists of name, ID, data license and a number of permissions.
You can embed the access status for an entry directly in the wiki page for the entry with the access_status tag.
This is only shown for logged in users and gives you the opportunity to see what access anonymous users have.
 Image 2: Entry Status
{{access_status fullAccess="false" }}